SmartThings API Creating a Custom App: Testing out the API with Postman (Part 3)
Continuation of my experience with creating a SmartThings custom app to make API calls to (See Part 2 on configuring the app here). This part took me sometime to get all the correct parameters so I figured I’d provide a walk through of where to get all the information required to make your first call to the SmartThings API from your custom app.
- Install Postman from here
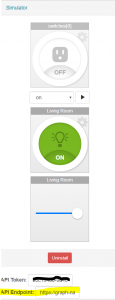
- Get the API EndPoint URL from the IDE-> Simulator (Devices must be installed, see previous blog post) ->At the very bottom there’s a link for the API Endpoint. This will be used as the base of the URL
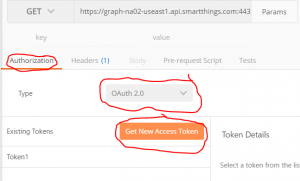
- SmartThings supports OAuth2. Click here for the SmartThings documentation on authenticating. In PostMan select the Authorization tab -> OAuth 2.0 -> Get New Access Token
- Next we will go to App Settings on the IDE in the browser and scroll to the second to last option OAuth. Generate a new Client ID and Client Secret as needed. If this does not work, try entering in your endpoint base URL prior to the /oauth and /oauth/token.
Parameters:
Token Name: *MyToken* <-whatever you want it to be
Auth URL: https://graph.api.smartthings.com/oauth/authorize
Access Token URL: https://graph.api.smartthings.com/oauth/token
Client ID : From App Settings -> OAuth -> Client ID
Client ID : From App Settings -> OAuth -> Client Secret
Scope : app
Grant Type : Authorization Code - Once you select Request New Token you should be prompted with the SmartThings login page where you enter your credentials and authorize the desired Location. If the error that no the app is not registered for that location you need to make sure in the mobile app you have granted permission for the app to access that specific accessory. (See Part 2)
- You have your first access Token!
The final step is to create your GET request or PUT request.
Format: BaseURL:443/path
Examples:
GET example URL: https://graph-na02-useast1.api.smartthings.com:443/api/smartapps/installations/******/switches
If you used the code provided in my example you should see a JSON response like:
[
{
“name”: “switches[0]”,
“value”: null
},
{
“name”: “Living Room”,
“value”: “on”
}
]
PUT example URL: https://graph-na02-useast1.api.smartthings.com:443/api/smartapps/installations/********/switches/on
This should turn on all the accessories you are connected to in the app.
2 thoughts on “SmartThings API Creating a Custom App: Testing out the API with Postman (Part 3)”